
Guitar chords are groups of notes played together. Learning chords is the fastest way to play songs. This guide will teach you the most important chords, how to hold them, how to change between them, and a short practice plan. I also included a chord table and a simple music tab you can try right away.
1. What is a guitar chord?
A guitar chord is three or more notes played at the same time. Chords give a song its harmony and mood. When you press several strings with your fingers and strum, you are playing a chord.
2. The first things to get right
Before playing chords, make sure:
Your guitar is in tune. Use a tuner or tuning app.
You sit comfortably with the guitar resting on your leg.
Your thumb stays near the back of the guitar neck for support.
Fingertips press the strings — not the flat part of your fingers.
3. How to read a chord chart (step by step)
A chord chart (diagram) shows:
Six vertical lines = the six strings (left = thick E, right = thin e).
Horizontal lines = frets.
Black dots = where to put fingers.
Numbers under dots = which finger to use (1=index, 2=middle, 3=ring, 4=pinky).
An “O” above a string = play it open. An “X” = don’t play that string.
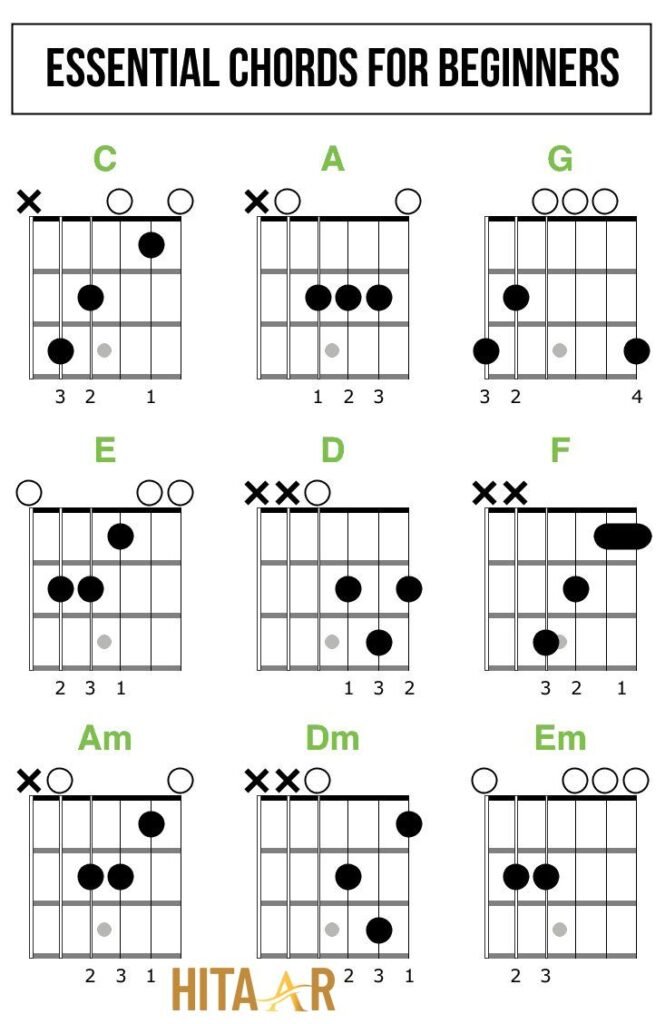
4. Five easiest chords to start with
Start with these five open chords. They appear in many songs.
| Chord | Strings to play | Fingering (finger numbers) | Short tip |
|---|---|---|---|
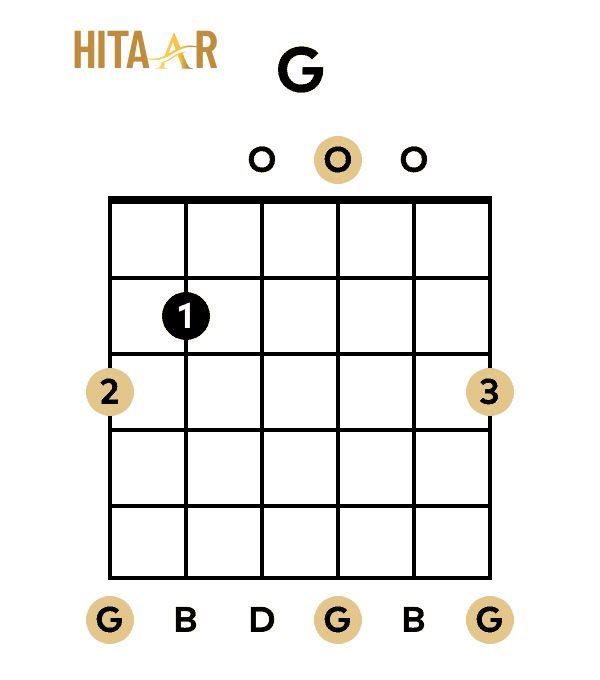
| G | All strings | 3 (low E, 2nd fret) — 2 (A string, 2nd fret) — 4 (E string, 3rd fret) | Press firmly; arch fingers so strings ring. |
| C | Play from A string to high E | 1 (B string, 1st fret), 2 (D string, 2nd fret), 3 (A string, 3rd fret) | Don’t hit the low E string. |
| D | Play from the D string to the high E string | 1 (G string, 2nd fret), 2 (e string, 2nd fret), 3 (B string, 3rd fret) | Keep fingers close to the fret. |
| Em | All strings | 2 (A string, 2nd fret), 3 (D string, 2nd fret) | Very easy — only two fingers. |
| Am | Play from the A string | 1 (B string, 1st fret), 2 (D string, 2nd fret), 3 (G string, 2nd fret) | Keep wrist relaxed. |
5. How to place your fingers (step by step)
Look at the chord chart. Find where each dot is.
Put the finger on the string just behind the metal fret (not on top).
Press down and make a small arch with your finger so it does not touch neighbouring strings.
Strum the chord once slowly. If a string buzzes, lift the finger slightly and press a bit harder.
Practice until each string rings clearly.
6. Common chord shapes and why they work
Open chords like G, C, D, Em, and Am use open strings (strings that ring without a finger). These shapes are easy and sound full on acoustic guitars. Power chords (two-note shapes) are useful for electric guitar and rock songs, but beginners should focus on open chords first.
7. Step-by-step practice routine (15–30 minutes daily)
Warm up (3–5 min): Finger stretches and play single-note scales slowly.
Strum basics (3–5 min): Strum down on open strings to feel rhythm.
Chord placement (5–10 min): Place and strum each chord (G, C, D, Em, Am) 8 times. Focus on clear sounds.
Switching chords (5–10 min): Practice changing between two chords slowly (G → C, C → D). Use a metronome set slow.
Play a progression (5–10 min): Use a simple progression (see below) and strum along.
Increase speed only when changes are clean.
8. Simple chord progressions to practice

A chord progression is a sequence of chords. Repeat these slowly until changes become natural.
Progression A (very common): G — C — D — G
Progression B (sad/soft): Em — C — G — D
Progression C (folk): G — D — Em — C
9. Short music table: chord positions and a tiny tablature
Below is a simple tablature showing one measure (four beats) for the G → C → D → G progression using whole-strum beats (one strum per chord). Tablature (TAB) shows strings with numbers for frets.
Strings: e|B|G|D|A|E (top row = high e)
Chord finger positions (fret numbers per string)
G: 3-2-0-0-0-3 (e B G D A E)
C: 0-1-0-2-3-X
D: 2-3-2-0-X-X
TAB (one strum per chord):
e|–3—0—2—3–|
B|–0—1—3—0–|
G|–0—0—2—0–|
D|–0—2—0—0–|
A|–2—3—X—2–|
E|–3—X—X—3–|
G C D G
Play each chord once per measure. Count 1-2-3-4 while strumming.
10. How to change chords smoothly (practical tips)
Watch your fingers move — not your whole hand.
Keep fingers close to the fretboard during changes.
Train with two-chord drills: play G for 4 counts, then C for 4 counts. Repeat until smooth.
Slow down: use a metronome and reduce speed by half.
Use anchor fingers: sometimes one finger can stay in nearly the same place between chords and help change faster.
11. Dealing with buzzing or muted strings
If a string buzzes or is muted:
Press closer to the fret.
Check that your finger is curved so it does not touch adjacent strings.
Raise your thumb on the back of your neck to give your fingers leverage.
Tune the string — sometimes buzzing is just poor tuning.
12. Basic strumming patterns (start simple)
Down strum only: Strum down each beat — good for beginners.
Down-Down-Up-Up-Down: A friendly pop/folk pattern (count: 1 2 & & 4).
Practice slowly and keep a steady rhythm.
13. Simple song to practice (4 chords)
Try the progression: G — Em — C — D (repeat). Many songs use these chords. Strum each chord for 4 beats and sing or hum while playing.
Tab for one bar (G → Em → C → D) — two beats each
E|–3–0–0–2–|
B|–0–0–1–3–|
G|–0–0–0–2–|
D|–0–2–2–0–|
A|–2–2–3–X–|
E|–3–0–X–X–|
G Em C D
14. Simple music theory for chords (one short paragraph)
Chords are built from scales. The most common chords (major and minor) come from the major scale. A G major chord uses the 1st, 3rd, and 5th notes of the G major scale. You do not need deep theory to start — practice first, learn theory when you feel ready.
15. Tools and apps that help (short list)
Guitar tuner app (tune by ear or automatically).
Metronome app (keeps a steady beat).
Chord chart apps (show diagrams and play sounds).
16. Troubleshooting & learning tips
If fingers hurt, slow practice — calluses are normal and helpful.
Practice daily for small amounts; it is better than one long session.
Record yourself to hear timing problems.
Learn a whole simple song — this is motivating and practical.
17. Next steps after these basics
Learn barre chords (F major, Bm) when you’re ready.
Learn power chords for rock music.
Learn chord melody and fingerpicking patterns.
Start improvising with a simple scale (like the pentatonic).
18. Final encouragement
Learning guitar chords opens the door to playing thousands of songs. Stay patient, practice slowly and often, and enjoy the little wins — like your first clean chord change.
Appendix — Printable chord chart (copy & paste)
(Use this as a quick reference)
G: 3-2-0-0-0-3
C: X-3-2-0-1-0
D: X-X-0-2-3-2
Em: 0-2-2-0-0-0
Am: X-0-2-2-1-0
7-Days Guitar Chord Practice Plan (For Beginners)
This plan helps you learn basic guitar chords quickly and smoothly. Each day takes 15–25 minutes. Keep your guitar tuned and practice slowly.
Day 1 — Learn Your First Chords (G, Em)
Goal: Understand chord shapes and make clean sounds.
Warm hands with finger stretches (2 minutes).
Learn the G chord shape and press each string slowly.
Strum down 8 times; repeat 5 rounds.
Learn the Em chord shape and repeat the same steps.
Practice switching G → Em for 5 minutes.
Day 2 — Add C and Am Chords
Goal: Learn two new chords and control finger pressure.
Review G and Em.
Learn the C chord shape slowly.
Learn the Am chord shape slowly.
Practice switching:
C → Am
Am → Em
G → C
End with 1 simple progression: G – Em – C – Am
Day 3 — Add D Chord
Goal: Build confidence with a new chord and cleaner transitions.
Warm up for 2 minutes.
Practice D chord for 10 minutes.
Practice switching:
D → G
D → C
D → Em
Play progression: G – D – Em – C
Day 4 — Strumming Practice + Chord Changes
Goal: Improve rhythm and hand control.
Learn one strumming pattern:
Down – Down – Up – Up – DownApply the pattern to G, Em, C, D (2 minutes each).
Practice chord changes with the pattern:
G → C
Em → D
End with progression: G – C – D – G
Day 5 — Speed Up Changes
Goal: Increase switching speed without losing clarity.
Metronome at 60 BPM (slow).
Switch every 4 beats: G → C → D → Em → Am
Raise tempo to 75 BPM slowly.
Play progression: Em – C – G – D
Day 6 — Play Your First Song-Style Loop
Goal: Combine chords + strumming smoothly.
Use this loop (common in many songs):
G – D – Em – C
Play each chord for 4 beats.
Add the strumming pattern you learned.
Repeat the loop for 10 minutes nonstop.
Stay relaxed; keep your wrist loose.
Day 7 — Full Practice, No Pauses
Goal: Play confidently from start to end.
Warm up (2 minutes).
Review all 5 chords (G, C, D, Em, Am).
Play this full progression:
G – D – Em – C – Am – Em – D – GTry one simple song using G, Em, C, and D.
Record yourself to hear progress.


Pingback: What Is A GM Chord On Guitar? - Hitaar: Newly Explored
Pingback: Plectrums For Guitar: The Beginner-Friendly Guide To Better Sound - Hitaar